Search for images or info
Grid Drawing
I must admit, grid drawing wasn't something I tried when I first started to draw. My sister kindly made a transparent grid for me but I didn't get around to using it for a long time.
Once I made the commitment to trial it, I was ecstatic with the results. So, I've been experimenting ever since and I just have to show you this option that can help speed up your drawing progress.
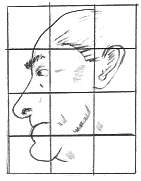
Oh man, have I had fun with this!
I have been practicing portrait drawing for quite a while now but progress was slow. I realize now that grid drawing will really help me improve dramatically when it comes to drawing faces and such.
I was surprised to learn that many established artists use grids, especially for portraits, to help them achieve a good resemblance.
At first, I was a little disappointed because I thought there must have been a secret way to successfully draw faces freehand but maybe that's not true. If there is, I haven't found out about it yet!
I guess the decision to use grids is up to the individual artist and whatever gives them the best results.
Anyway, I discovered that grid drawing is especially good for trainee artists because it makes you concentrate more on the direction of lines and how they are placed in relation to each other. It's all a part of the learning curve.
How To Draw A Grid
Let's say you want to make a grid with 1 inch squares.
Make sure the picture you want to copy is very clear so that you can do the exercise properly.
It's ok to rule guidelines directly onto a picture or photo but it's a good idea to do this on a second copy. That way, you don't ruin the original because you might need to refer back to it later, without the distraction of guide lines.
1.
On the reference picture, mark the border (4 sides) with dots at every inch.
IMPORTANT: Try to be as accurate as you can!
2. Count the number of dots on opposite sides (i.e., top and bottom, then left and right) and make sure there are the same number of dots on those opposing sides.
3. Use a ruler to insert equally spaced lines between matching dots. You should now have a grid over your reference picture.
Ok, so that is the first part of the project finalized.
4. Next, get a sheet of blank paper and draw the border to the exact same dimensions as the picture you are copying.
Use a B pencil and do the lines lightly, so they erase easily. Mark the dots (every inch) along the borders of this second grid and again make sure they are accurate.
Handy Tip:
If you want to enlarge the picture, double measurements on the grid you draw up, including the border dimensions, and use 2 inch squares.
If you want to have an image half the size, use 1/2 inch squares on your paper.
There must be the same number of squares - regardless of re-sizing - the system won't work otherwise.
Categories
Sketches
Instruction
Freebies
Other Areas

** Disclaimer: I receive a small commission if you buy via my links -- at no extra cost to you. **
The How To Sketch Guide
Here's a book that finally dispels the mystery of sketching!
... it only takes a little instruction
or guidance... Read more >>
Testimonial
The How To Sketch book is great!
It's designed for the beginner, but it has some good information and exercises even for the experienced artist.
It takes you from looking at your subject properly to conveying that onto paper.
It's a must-have for anyone who wants to learn how to sketch and also for those who want to improve their drawing skills.
Michael, USA.
You now have 2 grids, one on your reference picture and one on your paper.
5. When you are ready, start copying the outline of your subject in each square. If you are right handed, start with the top left square and work your way down and across. Vice versa for left handed artists.
Here's a grid you can print out, all ruled up and ready to go (that link opens a new window).
Some Alternatives
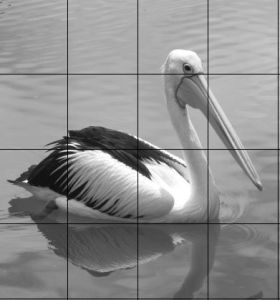
If you want to use an image that you have saved to your computer, see the directions for PhotoFiltre - a free drawing program that puts squares neatly and precisely on the photo for you.
Then you can print it out and it's ready to go as your reference picture.
Instead of printing the picture, I copied directly from the computer screen. I didn't get it quite right so it's lucky we're not playing "Spot the difference"!
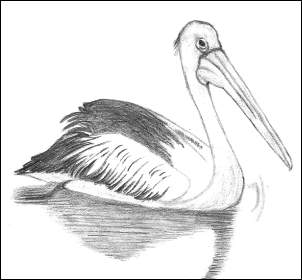
Another option is to use a transparency which saves you the time and trouble of drawing a grid on your reference picture. A transparency is a clear piece of plastic that is mainly used on projectors.
Here is a tip from Iarya (in USA) who made use of materials from home.
- Buy some heavy duty freezer ziplock bags.
- Draw the lines on them in permanent thin tip marker.
- Make 1/4", 1/2" and 1 inch grids in sandwich, quart and gallon size (or small, medium and large).
- Cut off the zipper.
- Slip the item in to a corner and use clips to clip it in so it doesn't move.
- You can use books, photos or anything. Just line them up. They are reusable and they protect the original.
Thanks for sending in your handy tip, Iarya, it's very useful.
It's a good idea to have a few transparencies ready in all different sizes.
Advantages and Disadvantages
Grid drawing is popular with trainee artists because:
- Step by step or one square at a time - it's achievable.
- You see proof that you really can draw!
- You're confident, you only have to fill in little bits each square.
- Your drawing surprises you and it's a nice feeling.
- You get to experience peace and contentment without pressure to perform.
- A grid helps you to focus on 'parts'.
- Everything is in proportion.
- The end result is fairly accurate.
- Helps you draw what you see which ultimately sets you up to draw on your own.
- You know you will be successful.
- It works!
Ok, so that's a heck of a lot of advantages, right? There are probably more but those are off the top of my head.
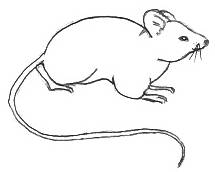
Now, let's look at the down side should you totally rely on using grids:
- It's restrictive and there's so much more to discover!
- It might diminish your confidence to draw outdoors.
- Is it really you? Do the resulting images reveal who you are?
- Does it stifle the creativity inside of you?
- You become reluctant to leave the safety net they provide.
We all avoid making mistakes but there is nothing wrong with experiencing failure because it is the only way we truly learn. I remember all my mistakes and I don't really want to repeat them.
Tips For Grid Drawings
- To prevent being overwhelmed by a lot of squares on a grid drawing, you can cover some of your original picture with a blank piece of paper. This means you can concentrate on a couple of squares at a time.
- Keep your picture and your drawing close together so you can glance from one to the other.
- Start at whatever square you want to. I am right-handed so I start at the top left square to prevent smudging.
- Judge where the line starts within the selected square by noting if it's halfway down or at the top, etc.
- Focus on the lines in that square only.
- Use blu-tack to attach a transparency onto the picture or photo - it is very important that the grid doesn't move!
- Use a small paint brush to remove eraser residue from your paper without smudging.
- Optional: Use a magnifying glass to see if any stray lines are left behind.
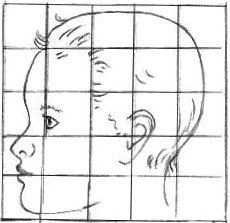
When you double the size of the image, you learn more about your subject as well as things like identifying negative space.
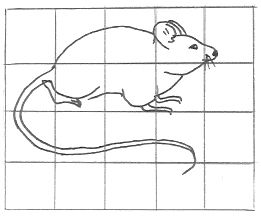
Ruling up the grids can be tedious. I admit I was a bit sloppy with some measurements (as seen in the image here) and that tells its own tale in the resulting image.
Being as accurate as possible will limit errors and disappointment.
This is a good opportunity for you to learn from my mistakes so please be aware that unequal squares do not give good results for grid drawings.
You never finish learning about drawing, do you? It is such an exciting and interesting hobby.
I hope you achieve fantastic results with grid drawing. At the very least, you won't be sorry you spent the time playing with it because it all results in good practice.
Click a link below to view some different pencil techniques:
* Allaboutdrawings.com is a participant in the Amazon Services LLC Associates Program, an affiliate advertising program designed to provide a means for sites to earn advertising fees by advertising and linking to Amazon.com.
Copyright © 2005 - 2025 www.allaboutdrawings.com. All rights reserved.


