Search for images or info
How To Make A Viewfinder
When I started to draw, I was always curious how to make a viewfinder and I am happy to say it turns out to be a very simple process that I can share with you.
A viewfinder is used to remove lots of fussy details so you can focus on one particular area that you want to copy. I can't say I use mine a lot but I did use it initially to learn its function and to understand more about it. It does come in handy sometimes, it really depends on what subject I choose to draw.
To begin making your own viewfinder, you need a piece of cardboard - I used one side of an empty cereal box but anything like that will do.

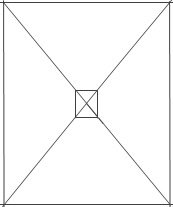
- Cut a piece of cardboard to A4 letter size (rectangle), 8½" x 11".
- Rule lines diagonally across it, going from one corner all the way to the one opposite.
- In the center (where the lines crossed), draw a rectangle measuring one inch by one and a quarter inches (1" x 1¼").
- The one inch side should correspond with the shorter side of your cardboard, making the rectangle in the middle to be in proportion with the whole cardboard rectangle.
- Cut out the inner rectangle using a sharp blade to easily and cleanly penetrate the cardboard.
- You now have a drawing tool known as a viewfinder.
The 8½" x 11" measurement is a good 'one size fits all' because drawing paper is generally rectangular. If you choose to draw within a square frame, the viewfinder/hole should be square.
The width of cardboard surrounding the hole blocks out a lot of distractions and that helps you focus more on the subject matter.
Amazon Affiliate Link
Of course, you can always buy a readymade viewfinder if you don't want to make one yourself.
How To Use A Viewfinder
Hold your viewfinder out in front of you, with your arm outstretched.

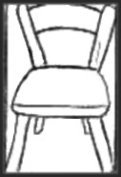
For an example subject, sight a chair within the center frame. If it helps, close or cover up one eye when you look through the hole.
Make sure the chair is touching at least 2 sides of the viewfinder rectangle.
This forms a border around the chair and enables you to see the negative space between the chair and the borders.
It might take some time but wait until you can see the negative space as a shape.
By keeping your arm outstretched and noting where the object is touching the border, you should see the same view each time you look through it.
Have you ever seen artists using their fingers to form a square? Their arms are outstretched and they look like they are framing the view before them. They are actually using their fingers as a border and they are visualizing what they want to draw.
Looking at a whole landscape can be daunting so the artist selects one area to concentrate on and a viewfinder does this same job for you.
The small glass square on a camera is also known as a viewfinder. It would be great if you could use your camera to do this exercise but it's a bit difficult because you won't have a hand to draw with! A light piece of cardboard is easily held in one hand while you draw with the other.
Now you know how to make a viewfinder, you can experiment with numerous subjects to familiarize yourself with negative spaces.
Categories
Sketches
Instruction
Freebies
Other Areas
The How To Sketch Guide
Here's a book that finally dispels the mystery of sketching!
... it only takes a little instruction
or guidance... Read more >>
Click a link below to view a good variety of pencil tips:
* Allaboutdrawings.com is a participant in the Amazon Services LLC Associates Program, an affiliate advertising program designed to provide a means for sites to earn advertising fees by advertising and linking to Amazon.com.
Copyright © 2005 - 2025 www.allaboutdrawings.com. All rights reserved.


